boAt is a very famous audio company of India which has been launching its audio devices at affordable prices since 2016, but have you ever tried to see that the word boAt, which has the alphabet A in its name, is always the capital letter.
There is a reason behind this. We will tell you in this article why ‘A’ is always written in the capital in the word boAt, so let’s start.
Why ‘A’ is capital in boAt?
In fact, the name of the company is such that it represents one boat, so if it kept the letter ‘A’ small, then the shape of the boat would not fit in it.
Therefore, in the word boAt, A is written in capital letters so that appropriate space is left in it and the actual boat can be shown in it.
So this is the reason why the boAt has written the alphabet A in capital.
How do I come to know why A is capital in boAt?
At first I was also very surprised to see why ‘A’ is always written in capital letters and then I tried to find the reason but I could not find anything from anywhere.
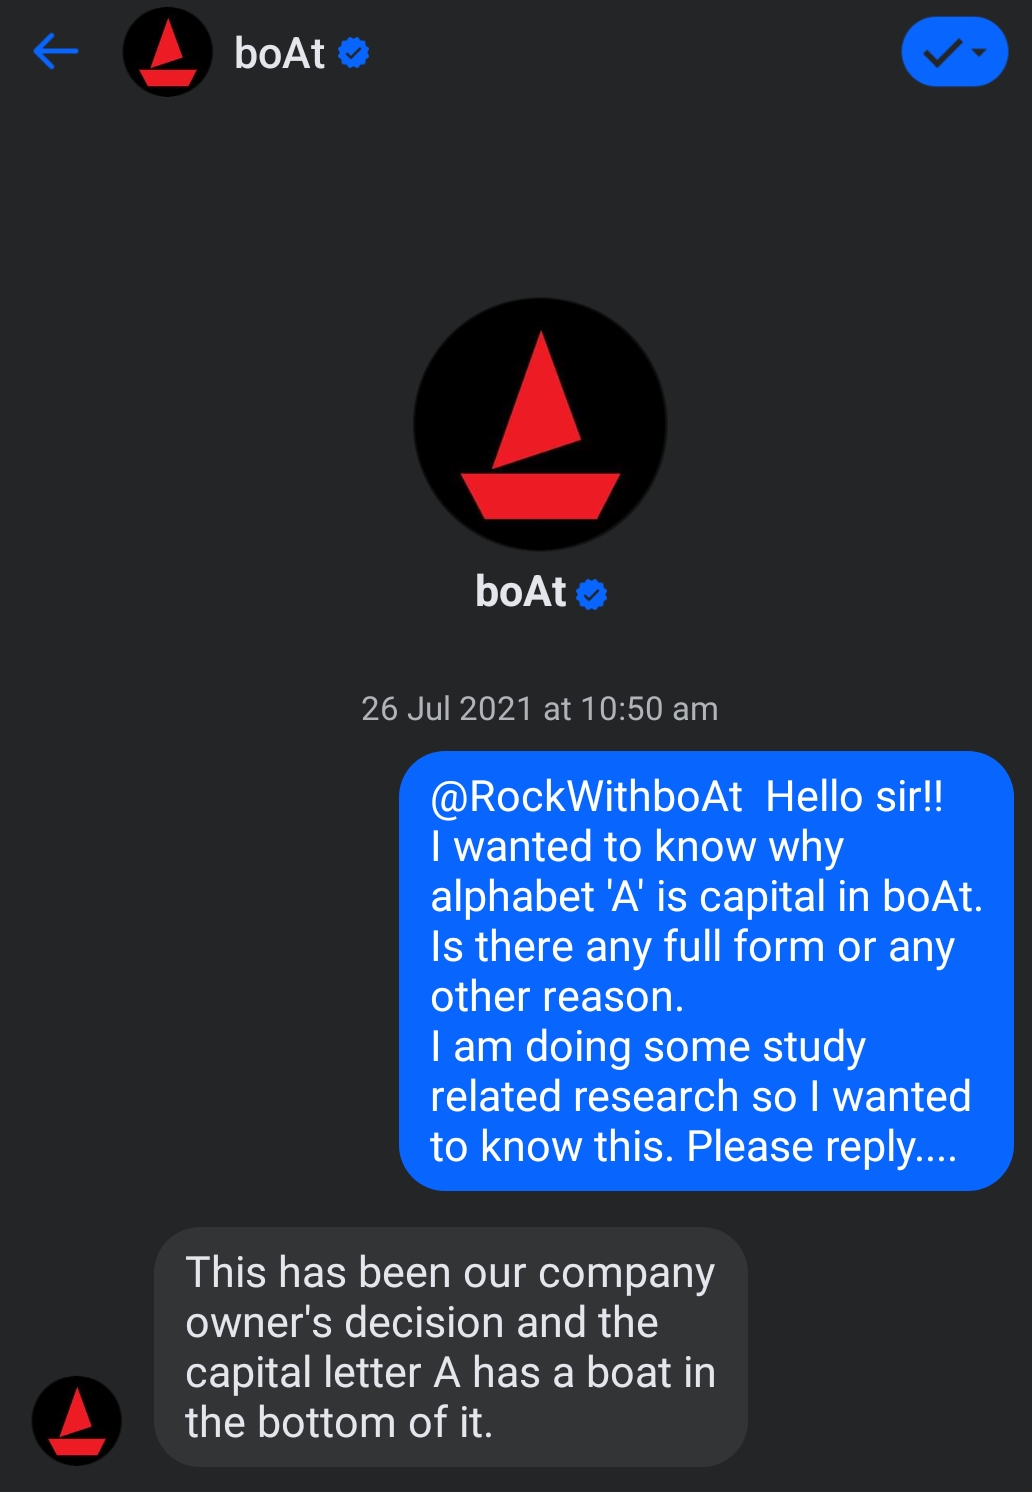
Then I contacted the customer care of the boAt. I contacted on Facebook. I sent him a message through the messenger and asked the reason.
Then they replied to me and I came to know about it. I have also attached the screenshot of this conversation here.
If you are using Netplus broadband and want to change your wifi password, then you are at the right place. In this article, I will tell you how to change Netplus wifi password and name in simple steps.
Netpus broadband is owned by the Fastway Cable TV Network. It provides its services in north India. Netplus provides Internet Services through FTTH (Fibre to the Home) Optical Fibre technology.
The company uses mainly two kinds of wifi routers. One is ZTE and another is the Nokia router. If you have any one of these routers and you are searching for how to change your Netplus wifi password and its name then here is the complete guide for how to change Netplus password and name.
Know these details Before Changing Netplus wifi Password
Before you move ahead to change the password of your Netplus wifi router you should get these details:
Get the Netplus Router IP address
The very first step for Fastway Netplus wifi password change is to access the IP address of your wifi router. You must have a desktop PC connected to the internet through an ethernet port or you can use a laptop connected to your wifi.
You must be connected to the current network in which you want to change the password or name. You can do this on your Android or Apple mobile also which I will discuss later in this article.
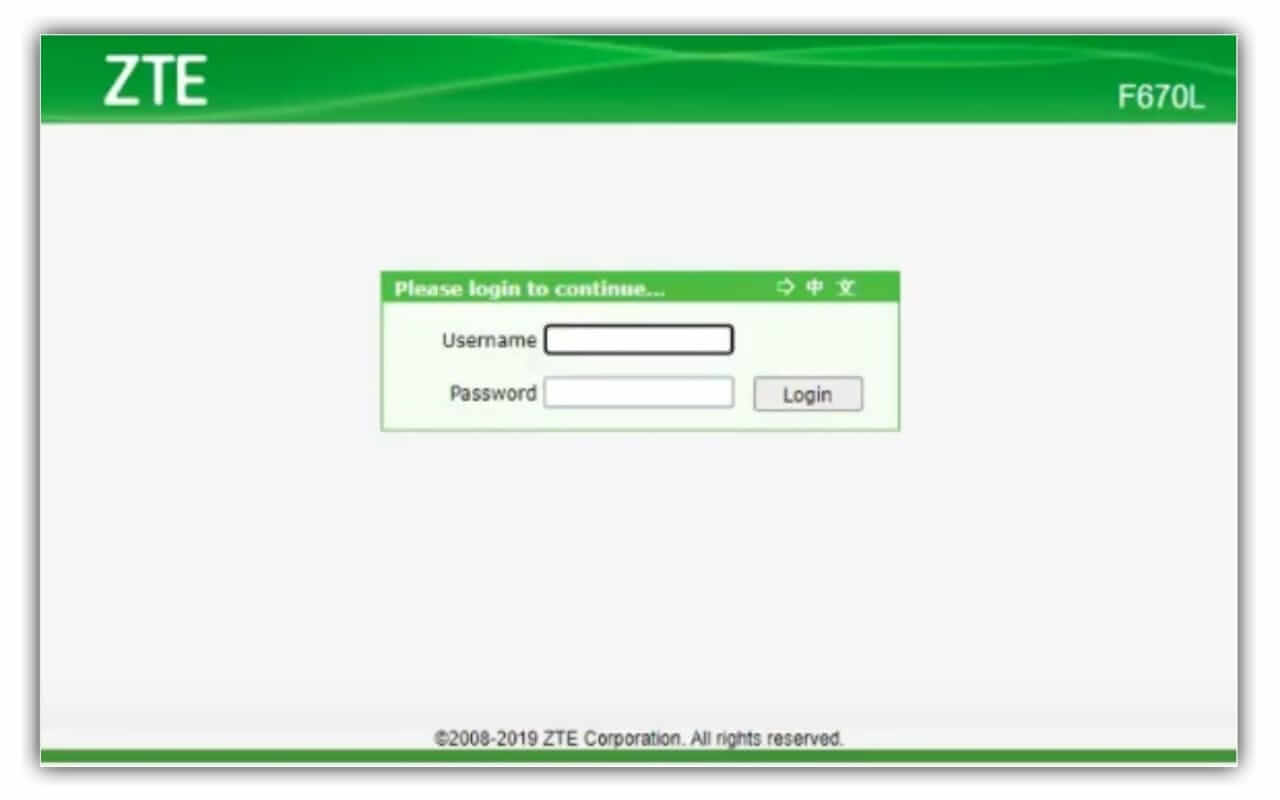
What is the IP Address of the ZTE router?
If you have a ZTE router then your Netplus router IP address would be 192.168.0.1 or 192.168.1.1 as these are the default IPs for ZTE routers. You can enter this IP address in your browser for Netplus admin login to change the password. After entering this IP address you will be landed on the following page.
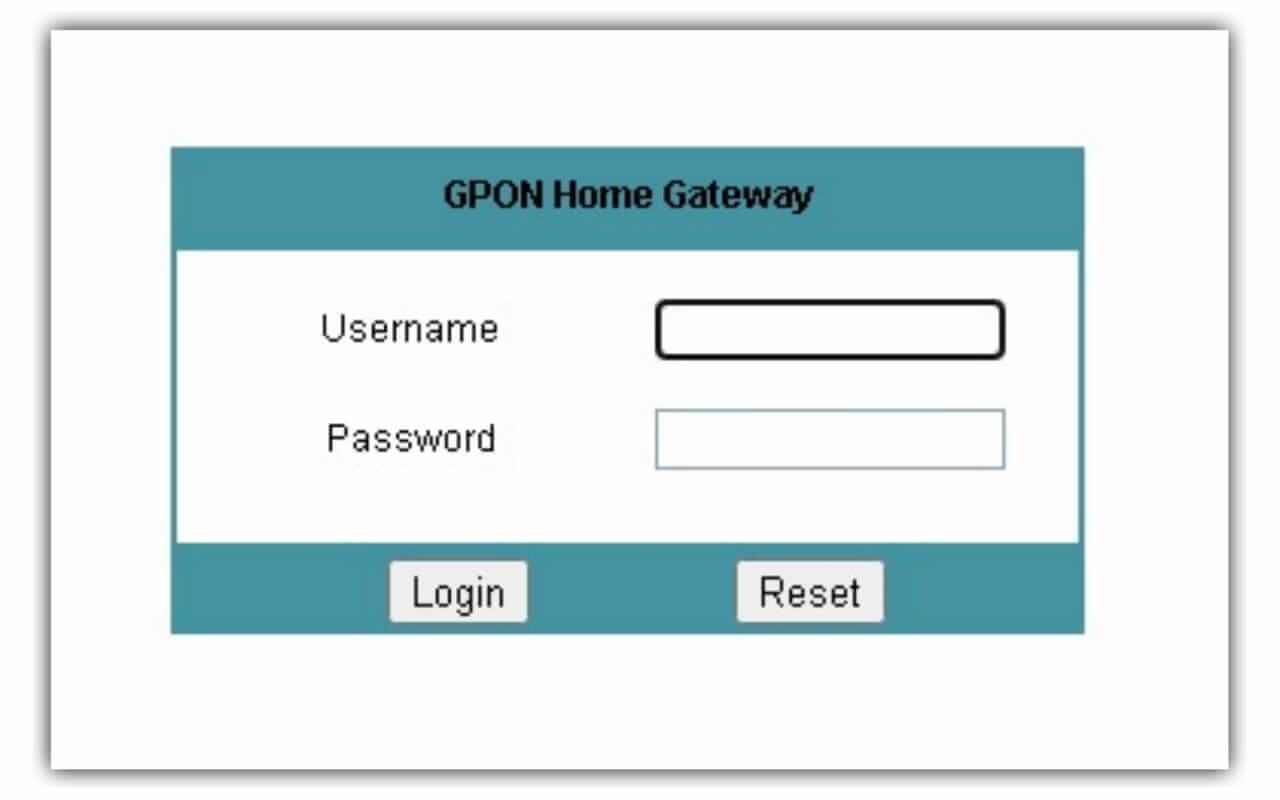
What is the IP Address of the Nokiarouter?
If you are using the Nokia router then your IP address would be 192.168.1.254 as it is the default IP used by Netplus for the Nokia router for Netplus broadband admin login. When you enter this IP address you will be landed on the GPON Home Gateway page as shown below.
Netplus uses these two IP addresses but if you are unable to access the login page then it is advised that you must check the IP address to access Netplus admin login. In most cases, the IP address is written on the router.
Get the Netplus Username and Password
After you have accessed the netplus admin login page you have to enter your username and password here. These usernames and passwords are provided by Netplus Broadband.
There are two usernames and passwords given by Netplus, one for the router admin login page and another for the Netplus account login page. Let us discuss these one by one.
If you are talking about the router admin configuration page to change Netplus wifi name and password then the username and password will be router dependent provided by Netplus. This is your Netplus router username and password. The default username and password are given later in this article.
But, if you are talking about the Netplus account login page then the username and password would be different. You have to enter the Netplus customer ID as the username and password provided by Netplus. This is your Netplus account username and password.
The default username and Netplus router login password are always provided by Netplus. If you don’t know or forgot these then you can easily find them on the router because the default username and password to log in to a router is always written on most of the routers.
The default username and password are always needed to log in to your router for the first time. After login, you can also change the router admin password and username.
What is the Default Username and Password for ZTE Router (ZTE F660)
For the ZTE router default username is admin and the default password is also admin but for most Fastway Netplus ZTE F660 wifi router default password is web@0063. You can also find it on the router. You can also ask customer care at 070875 70875 for the default username and password.
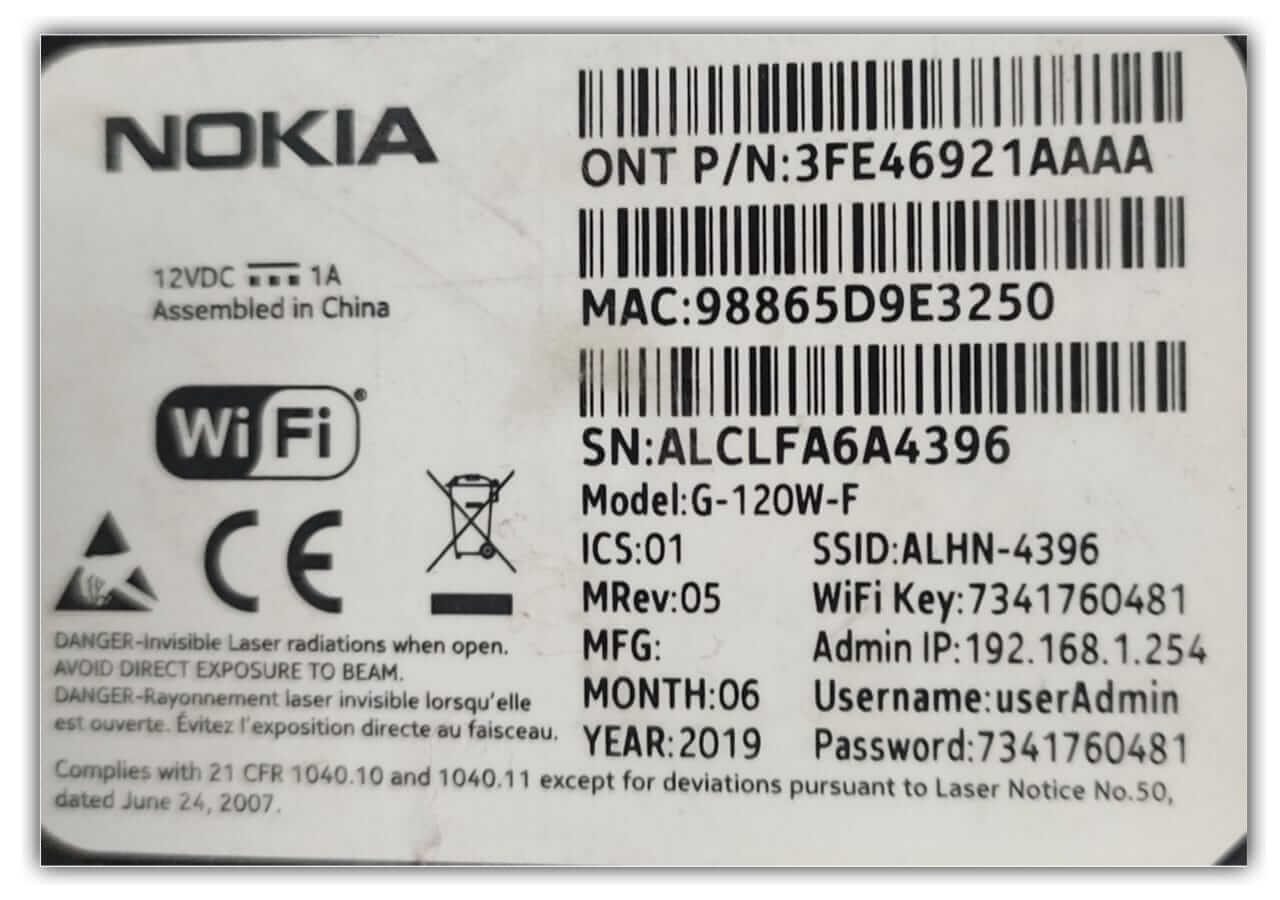
Nokia Wifi Router Default Password
For the Nokia router default username is userAdmin and the default password is some random number written on the Nokia router. Its default username and password are written on a sticker as shown below.
Now I will tell you the Netplus password change process for ZTE and Nokia routers in the upcoming sections.
How to Change Wifi Password Netplus ZTE Router
Here I will tell you how to change the ZTE Net Plus wifi password. First of all, you have to log in to your router. To do so you have to enter the username and password. Go to the Network setting and then in the WLAN setting and change the password.
Here is the step by step process for the ZTE Netplus router to change the password and name:
Connect your computer to the internet by LAN or wifi.
Open the internet browser.
Enter the ZTE router default login IP (192.168.1.1) and hit enter.
Enter username as admin and password as web@0063 and click on login.
Go to the Network option.
Go to the WLAN option
Now go to SSID Settings.
In the Choose SSID option, change it from SSID1 to SSID3.
To change the wifi name, rename it in the SSID Name option.
Now go to the Security option.
Select the SSID3 in the Choose SSID option.
Change the wifi password in the WPA Passphrase option.
Click on submit.
Done! Netplus wifi password and name successfully changed.
Video tutorial:
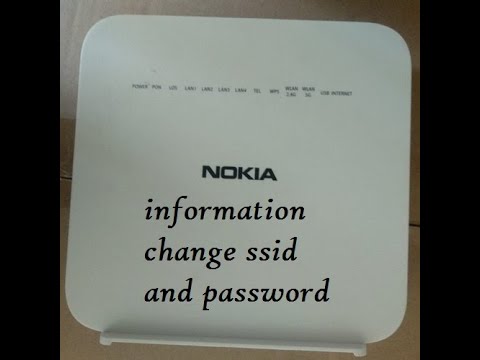
How to Change Netplus Wifi Password Nokia Router
If you have a Nokia router for Netplus broadband and if you want to change its wifi password, then I will tell you how do I change my password on my Nokia wireless router. Firstly login to your router to land on the GPON Home gateway page. Go to the Network option to change the password.
Here is the step by step process to change the Netplus wifi password and name for the Nokia router:
Connect your computer to the internet by LAN or wifi.
Open the internet browser.
Enter ZTE router default login IP (192.168.1.254) and hit enter.
Enter username as userAdmin and password as written on your router.
Go to the Network option.
Go to the Wireless (2.4GHz) option.
To change the wifi name, rename it to the SSID Name option.
To change the wifi password, enter the new password in WPA Key Option.
Click on save.
Done! The wifi password and name changed successfully.
Video tutorial
Frequently Asked Questions
How to Reset Netplus Router?
To reset your Netplus router you can log in to your router from the above steps and reset the wifi password and other settings. To completely reset your router to default settings you have to log in to it and go to the maintenance option to reset it. In the maintenance option, click on factory reset to completely reset the router.
It is advised not to factory reset your router by yourself because you have to enter your subscriber id information. You have to call a Netplus technician to do so.
How to Change Wifi Password on Mobile Netplus?
You can easily change the Netplus broadband wifi password on mobile. To do this just go to the mobile browser and follow the process as mentioned above. Each step is the same as above. Use desktop mode for better viewing.
Sometimes you type 192 168 l l Netplus by mistake instead of 192.168.1.1 to log in to your router. Please see the difference clearly. But if you are typing it correctly and still have a problem then you should contact Netplus customer care at +91 70875 70875.
Conclusion
I have provided the step by step guide to change the wifi password and name of Netplus Broadband. Also, I have covered some FAQs regarding it. Read the complete FAQ here. If you found this post useful then please share it and don’t forget to comment with your feedback and suggestions below.
Welcome to this step-by-step guide on how to give Facebook page admin access. Here we have given the simple steps to add an admin to a Facebook page and give them access to the page.
Facebook Page Admin Access is a feature that allows you to grant different levels of permissions to other people who help you manage your Facebook page. You can assign roles such as admin, editor, moderator, advertiser, or analyst to your page. Each role has different capabilities and responsibilities.
For example, an admin can do everything on the page, such as creating posts, deleting comments, changing settings, and adding or removing other roles.
An editor can do everything except change the settings and roles. A moderator can only respond to and delete comments, send messages, create ads, and view insights. An advertiser can only create ads and view insights. An analyst can only view insights.
So go through this article, follow the steps, and give admin access to your Facebook page to anyone you want.
How to see admins on Facebook page
If you want to see who is admin on a Facebook page then the answer to your question depends on whether you are managing the Facebook page or not. You can see the admins who have access to the Facebook page. You can also see the Facebook page admin roles or task roles of the admins.
If you are managing the page, you can see your role and other people’s roles by following these steps:
From your Feed, click Pages in the left menu.
Go to your Page and click Settings in the bottom left.
Click New Page Experience in the left column.
Click on Page Access from the top left column menu.
From here, you can see the list of admins with full access under the People with Facebook access section. Here,Admins with task access are listed under People with task access.
If you are not managing the page, you can try to find the admin by looking at the Page Transparency box in the left column of the page:
Search the Facebook Page you want to see the admin.
Keep scrolling down until you find the Page Transparency Box.
On the Page Transparency Box, click the See All button.
You may see a list of people who manage this page under the People Who Manage This Page section.
How To Give Facebook Page Admin Access
You can give Facebook Page Admin Access to other people who help you run your page. This way, you can share the tasks and benefit from their skills. You can choose different roles for them such as admin, editor, moderator, advertiser, or analyst. Each role has different abilities and duties.
For example, you can make someone an admin, who can do everything on your page, or an editor, who can create and edit posts. You can also make someone a moderator, an advertiser, or an analyst, who has more limited abilities.
You can only give admin access to your Facebook page to a person who is your friend on Facebook. So before you add the person as an admin and give him admin access you both have to become Facebook friends.
To give someone admin access to Facebook page, first, you have to add a person as admin of that page. While making admin, you have options to give him access to the Facebook page with different levels of tasks.
You can provide full access by selecting the option full control to Facebook page. You also have the option to give only a few task role access to the new admin being added. You can also add admin role in Facebook page at any time after making admin in the Facebook page roles settings.
Steps to make someone admin on a Facebook page on Android, iPhone, and PC is given below. These steps are given for the New Page Experience of Facebook page because today most pages are in new page experience.
How to add admin to Facebook page on mobile (Android)
You can give Facebook page admin access on your mobile phone when you add admin to your FB page.
Follow these steps to add an admin to a Facebook page on Android mobile.
Step 1: Log in to your Facebook page. Tap on the three horizontal lines at the top right corner.
Step 2: Tap on the settings icon.
Step 3: Tap on Page settings.
Step 4: Scroll down and go to Page Access under the New Page Experience section.
Step 5: Now tap on Add New link in front of People with Facebook access. Tap on Next button.
Step 6: Search the name of your friend by name, username, or email id. Select the person.
Step 7: Here on this screen, you can give Facebook page admin access to him with different levels of access as shown below. To give full access enable the button named Allow this person to also have full control. Now Tap on the button Give access.
Step 8: Now you have to enter your Facebook profile password to confirm that you want to give your Facebook page admin access to other person. Tap on confirm.
After all these steps an invitation link will be sent to the Facebook profile of the person so that he can become the admin. Once the person accepts your invitation, he will become a page admin and he will have admin access to your Facebook page.
The invitation link has an expiration period of 30 days and after 30 days the invitation link expires.
If you are using an iPhone and don’t know where to add admin on Facebook page. Here is the way to add an admin and give Facebook page admin access.
To add an admin to a Facebook page on iPhone, follow these steps:
Step 1: Launch the Facebook app and log in to your Facebook profile.
Step 2: Tap on Pages from the bottom menu and select the page where you want to add an admin.
Step 3: Tap the gear icon at the top-right corner of the page.
Step 4: Tap “Page Roles” and then “Add Personto Page” at the top.
Step 5: Enter the name or email of the person you want to make an admin. Select the person.
Step 6: Select “Admin” from the drop-down menu and tap “Add”.
The person will receive an invitation to accept the admin role. Once they do, they will have admin access to your fb page and full control over your page.
You can also add an admin on the Facebook page on your computer.
Follow these steps to add admin and give admin access to Facebook page on pc:
Step 1: Login to your Facebook page on a computer.
Step 2: Click on your page name from the top left corner.
Step 3: Click on Settings from the left menu.
Step 4: Go to New Page Experience from the left side menu.
Step 5: Here you can see an option as Add New under Manage and View access section, click on it.
Step 6: Click on Next. Now you will see a search bar. Search for your friend to add as admin and select it. You can assign a specific page role or full control of your page to him.
Step 7: Enter your Facebook password and click on confirm.
After all this, the person you added as admin will get an accept link to become admin to your page. When the invitation is accepted by the person, he has admin access to your Facebook page.
Video tutorial on how to give Facebook Page Admin Access
How to give admin access to Facebook business page
A Facebook business page is another name for a Facebook page. Both are the same thing. So to give someone admin access to Facebook business page you can follow the same steps as told above.
To remove an admin from a Facebook page, you’ll need to be an admin yourself. Here are the steps you to follow:
Go to the Facebook page.
Select Settings from the left column.
Then choose New Page Experience from the left column.
Here you can see the list of people who have admin access. Click on three dots against the admin name and click on Remove Access.
The person will be removed as admin.
FAQs on How To Give Facebook Page Admin Access
How to give someone admin access to Facebook page that is not your friend?
You cannot give Facebook page admin access to someone else who is not your Facebook friend. To add a person as an admin, you have to become friends on Facebook.
How to accept page admin invite on Facebook?
You’ll get an email or a notification once you’ve been given access or a role on a Facebook page. You have two options to accept the access of page: Click the notification, followed by Accept, or Click Confirm in the email.
Why can’t I add an admin to my Facebook page?
If the person you wish to add as an admin is not on Facebook or you are not friends with them, adding them as an admin is not possible.
Can I add another Facebook page as an admin on my page?
Yes, you can add another Facebook page as an admin on your page.
Conclusion: How To Give Facebook Page Admin Access
By giving Facebook Page Admin Access to others, you can share the workload of running your page and benefit from their skills and expertise. You can also control what they can or cannot do on your page by choosing the appropriate role for them. However, you should avoid giving admin access to anyone who is not a trusted person.
I hope this article on how to give Facebookpage admin access was helpful to you. If you have any questions or feedback, please leave a comment below. Thank you for reading.
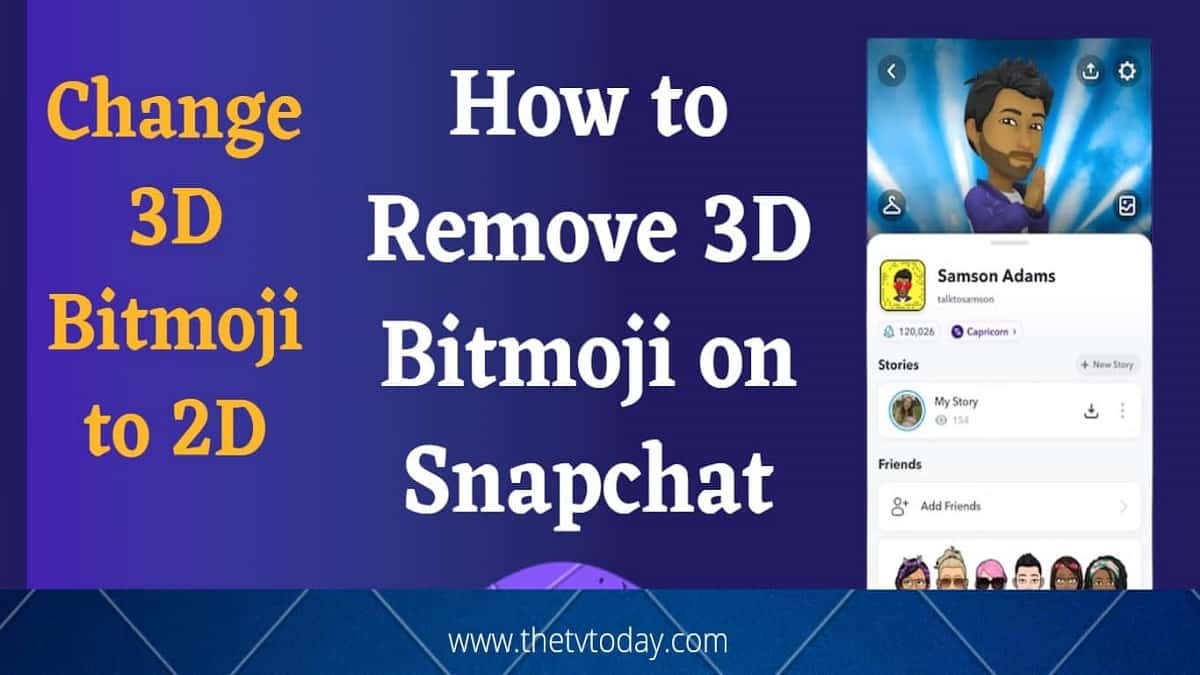
If you are searching for how to remove 3D Bitmoji on Snapchat then you are at the right place. The short answer to your question is this:
To remove your 3D Bitmoji on Snapchat you have to unlink your 3D Bitmoji selfie. To do so you have to open your Snapchat app. Now tap on the profile icon. Scroll down and go to the Bitmoji option. Now tap on the unlink Bitmoji option at the bottom. Your 3D Bitmoji will be removed.
Step by step process is given in the upcoming section.
Snapchat is a popular social media app that lets you send and receive photos, videos, and messages with your friends. One of the features that Snapchat offers is the ability to create and customize your own 3D Bitmoji, which is an animated avatar that looks like you.
But what if you want to remove your 3D Bitmoji from Snapchat? Maybe you don’t like how it looks, or you want to change it to 2D Bitmoji.
In this article, we will show you a step by step process to remove 3D Bitmoji on Snapchat on Android and iPhone. Whether you want to delete it permanently or just hide it temporarily, we have got you covered.
We will also show you how to change 3D Bitmoji on Snapchat to 2D. So read on to find out how to remove 3D Bitmoji on Snapchat and enjoy a more personalized experience on the app.
What is 3D Bitmoji on Snapchat?
3D Bitmoji on Snapchat is a feature that allows users to create and customize their own 3D avatar. You can use your 3D Bitmoji to express yourself in different ways, such as dancing, playing games, or posing for selfies.
These avatars can then be used in various Snapchat features, such as filters and lenses, to add a personalized touch to snaps and chats.
The 3D Bitmoji can also be added to the Snap Map, allowing friends to see where you are in real time with your personalized avatar. The previous version of the Snapchat app had 2D Bitmoji but the latest version has only 3D Bitmoji.
There are 2 types of Bitmojis on Snapchat.
What are the two types of Bitmojis?
The two types of Bitmojis are Bitmoji Classic and Bitmoji Deluxe. Bitmoji Classic is the original version of Bitmoji that features a more cartoonish and simplistic style, while Bitmoji Deluxe offers more customization options for users, including additional hairstyles, facial features, and accessories.
How to get 3D Bitmoji on Snapchat?
To get a 3D Bitmoji on Snapchat, first create or edit your Bitmoji in the app. Then, go to the Snapchat camera screen and tap on the smiley face icon. Swipe left until you see your Bitmoji avatar and tap on it to access the 3D version.
Why can’t I change my Bitmoji type?
There could be several reasons why you are unable to change your Bitmoji type:
Your Bitmoji account may be linked to a different email or social media account that you are not currently logged into.
You may not have the latest version of the Bitmoji app or Snapchat app installed on your device.
There may be a temporary issue with the Bitmoji servers that is preventing you from making changes to your avatar.
You may have reached the maximum number of changes allowed for your Bitmoji avatar.
The latest version of Snapchat does not allow changing the Bitmoji type from 3D to 2D. But In this article, you will find the way how you can change 3D Bitmoji on Snapchat to 2D.
How to Remove 3D Bitmoji on Snapchat
To remove 3D Bitmoji from your profile you have to unlink the Bitmoji from your Snapchat account. By unlinking the Bitmoji, your 3D Bitmoji avatar will be removed from your account.
To Remove 3D Bitmoji on Snapchat, follow these steps:
Step 1: Open the Snapchat app.
Step 2: Go to your profile by tapping on the profile icon.
Step 3: Tap on the gear icon in the top right corner to access your settings.
Step 4: Scroll down to the “Bitmoji” section and tap on it.
Step 5: Tap on “Unlink My Bitmoji” at the bottom of the screen.
Step 6: Confirm that you want to unlink your Bitmoji by tapping “Yes“.
After following these steps your 3D Bitmoji will now be unlinked and removed from your Snapchat account.
Video on How to Remove 3D Bitmoji on Snapchat
Can You Change 3D Bitmoji Back to 2D?
Directly, it is not possible to change your Bitmoji back to 2D once Snapchat is updated to the latest version. In the latest version of Snapchat, the Bitmoji is by default in 3D. There are options available to edit and customize your 3D Bitmoji avatar but there is no option to make your Bitmoji 2D.
However, you can make your 2D Bitmoji in an alternate way. We have to change the version of the Snapchat app.
Although the 3D Bitmoji avatar is a very good feature of Snapchat, it is not liked by everyone. Some people hate the 3D Bitmoji and want to go back to old Bitmoji avatar on Snapchat. So people usually search for these queries: How do I change my Bitmoji to classic 2023, How do I go back to classic Bitmoji, How do I change my Bitmoji version?
We have a solution for this. You can change your 3D Bitmoji on Snapchat to 2D by using an older version of Snapchat.
Here are the steps to change 3D Bitmoji to 2D on Snapchat.
Log out of your Snapchat account and uninstall the app.
Install this older version of the app and open it.
login to your Snapchat account.
Tap the Profile icon on the top-left corner
Scroll to find ‘Bitmoji’ and then select ‘Create My Avatar’
Your 2D Bitmoji will be created.
How to get rid of 3D Bitmoji selfie
How do I Remove Snapchat’s 3D Bitmoji Selfie?
In the latest version of Snapchat, the 3D Bitmoji is by default. So if you don’t like the 3D Bitmoji selfie and want to completely get rid of it, then it is not possible because there is no option to delete or remove 3D Bitmoji permanently from a Snapchat profile. What you can do instead is, you can unlink your 3D Bitmoji from your Snapchat profile.
However, after unlinking the Bitmoji 3D selfie from the Snapchat account, your current 3D Bitmoji Selfie resets to a generic 3D Bitmoji Selfie which is created by Snapchat by default.
Other than removing Bitmoji 3D selfie, you can also edit and customize it.
You can edit your 3D Bitmoji avatar easily on Snapchat using your Android phone or iPhone. You can change the dress, hairstyle, skin color, pose, background, etc and customize it completely.
To edit your 3D Bitmoji on Snapchat, follow these steps:
Open the Snapchat app on your phone.
Log in to your Snapchat account.
Go to your profile by tapping on your Bitmoji avatar icon at the top left corner.
Tap on your 3D Bitmoji avatar to get options to edit or customize it.
Tap on the edit avatar option to make changes to your 3D Bitmoji, such as changing the hairstyle or outfit.
Once you’re done editing, tap on “Save Changes.”
Your edited 3D Bitmoji will now be saved to your Snapchat account and can be used in your snaps and stories.
You can also use the Bitmoji app to edit your 3D Bitmoji and make changes to its appearance before importing it into Snapchat.
Removing your 3D Bitmoji on Snapchat is very easy. To do this you have to go to your Snapchat app, tap on the profile, tap on the Bitmoji option, and at last tap on the unlink Bitmoji option from the bottom. The step-by-step guide on how to remove 3D Bitmoji on Snapchat is already given.
Along with removing 3D Bitmoji, you can also change your 3D Bitmoji avatar to 2D easily. You only need to do is to change your Snapchat app version. You can follow the steps given above for how to change 3D Bitmoji on Snapchat to 2D.
Other than this you can edit your 3D Bitmoji avatar and customize it according to your choice.
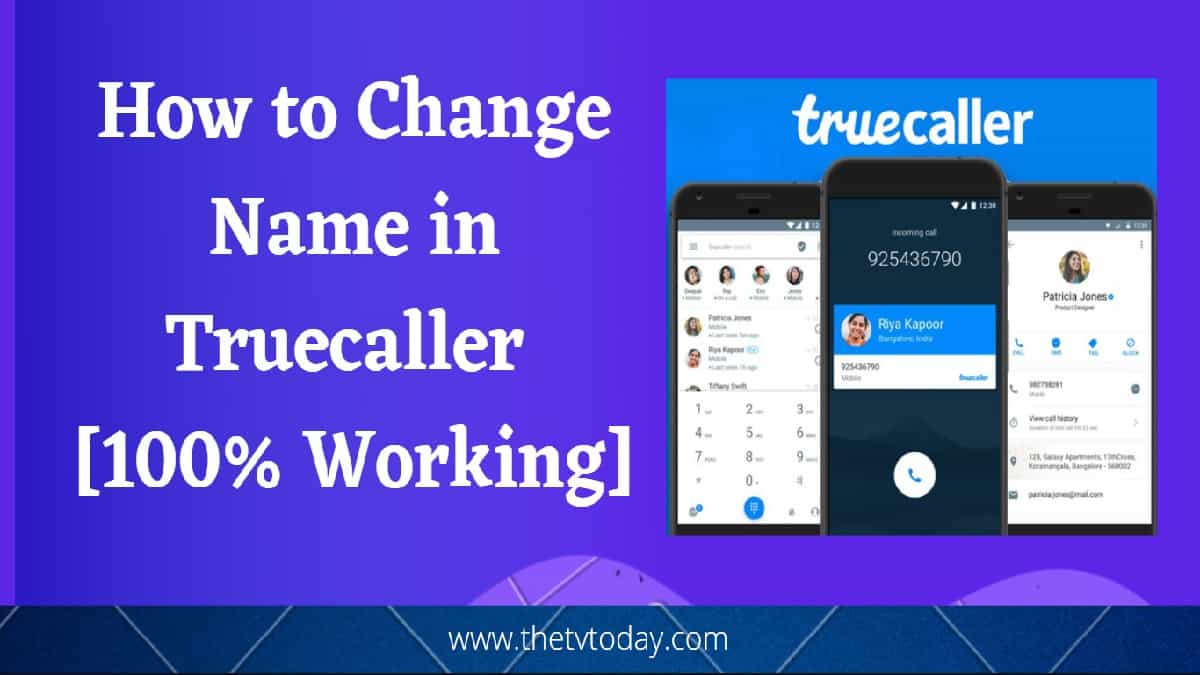
Truecaller is a popular caller ID and spam blocking application used by millions of people worldwide.
One of the many features of Truecaller is the ability to display the name of the person calling, even if their number is not saved in your contacts.
However, sometimes the name displayed on Truecaller may be incorrect, and you may want to change your name or display name on Truecaller.
In this article, we will explain step-by-step how to change your name in Truecaller easily, including the steps to change your name in Truecaller ID or Truecaller account, and the steps to change your display name in Truecaller.
So, whether you are wondering “Can I change my name on Truecaller?” or looking for a step-by-step guide on how to change name in Truecaller, read on to learn more.
My name shows incorrectly to others in Truecaller. How can I change this?
It can be frustrating when your name shows up incorrectly on Truecaller. Whether it’s a misspelling or a completely different name, it can lead to confusion and even embarrassment.
Fortunately, Truecaller does allow you to edit your name within the app, so you can ensure that others see the correct information when they look you up.
Why does the truecaller show the wrong name?
Here are the reasons why Truecaller shows the wrong name.
Truecaller gets its information from a variety of sources, including public directories and social media sites. So It’s possible that your name is showing up incorrectly on Truecaller because the app has pulled information from one of these sources that is incorrect or outdated.
Another reason why Truecaller may show the wrong name is that someone else has saved your contact information with an incorrect name. This can happen if someone misspells your name or enters a different name altogether.
It’s also worth noting that Truecaller’s algorithms are not perfect and can sometimes make mistakes. For example, if your name is similar to someone else’s, the app may confuse your identity and display the wrong name.
The easiest way to change your name in Truecaller is through the app on a mobile phone. Whether you are using an Android phone or iPhone, you can change and edit your name easily. Simply go to Settings and tap on Edit Profile. Change the name and tap on save.
If you don’t have the Truecaller application on your mobile, then first download the app from the Play Store or Apple app store. Now sign up or log in to your Truecaller account and follow the below step to change your name in Truecaller using mobile.
How to change name in truecaller app on Android phone
To change your name in Truecaller on an Android phone, follow these steps:
Open the Truecaller app on your Android device.
Tap on the three horizontal lines in the upper left corner of the screen to access the menu.
Select “Edit Profile” from the menu.
Tap on your current name to edit it.
Enter your new name in the “First name” and “Last name” fields.
Change your name in truecaller in iPhone (iOS App)
To change your name in Truecaller on an iPhone, follow these steps:
Open the True Caller app on your iPhone.
Tap on the three horizontal bars icon in the upper left corner of the screen.
Tap on the gear icon in the upper right corner of the screen to open the settings menu.
Scroll down to the “General” section and tap on “Edit profile”.
Enter your new name in the “Name” field and make any other desired changes to your profile.
Tap on the “Save” button in the upper right corner of the screen to save your changes.
How to change name in truecaller without app
You can also change your Truecaller name without installing the app. You can do this by visiting the website of Truecaller. You have to sign up or log in to your Truecaller account then edit your profile and change the display name.
In this way, your verified name in Truecaller will be updated, and correct will be visible to others. Your name in Truecaller will be changed for everyone.
Change truecaller name online in computer
To change your name on Truecallers online you need a mobile browser or computer. After opening the web browser follow these steps.
Log in to your Truecaller account using your credentials.
Now search your mobile number here.
You will see option to suggest name, click on it.
Edit your name and click on “Save” to update your profile.
Your name and profile information will now be updated on Truecaller.
It is to be noted that this process lacks a verification method to confirm your ownership of the phone number. Consequently, any individual can propose modifications to alter the name associated with a number in TrueCaller’s database. TrueCaller’s personnel reserves the right to reject inaccurate suggestions and decline requested changes.
We recommend you to change your Truecaller account name using the Truecaller app.
Video tutorial on how to Change Name in Truecaller
Some other Queries regarding changing name in truecaller
How to change name in truecaller for dual sim
If you want to change the name that appears in Truecaller for a specific SIM card, you can follow these steps:
Open the Truecaller app on your smartphone.
Tap on the three horizontal lines icon in the top left corner of the screen.
Select “Settings” from the menu.
Tap on “General” and then select “Profile.”
You will see your name and profile picture for the current sim. You can change the sim here.
Enter the name that you want to use for the specific SIM card and then tap on “Save.”
Note that Truecaller syncs with your phone’s contact list, so if the name is not updated, it’s possible that the name in your phone’s contact list needs to be updated first.
How to change name in truecaller for landline number
If you want to change the name that appears in Truecaller for a landline number, you can follow these steps:
Open the True caller app on your mobile phone.
Type in the landline number for which you want to change the name in the search bar at the top of the screen and tap on the magnifying glass icon.
If the number is saved in Truecaller’s database, you should see the name that currently appears for that number. Tap on the name.
Select “Suggest a better name” from the menu that appears.
Enter the new name that you want to use for the landline number and tap on “Submit.”
How to change business name in truecaller
If you want to change the business name that appears in Truecaller, you can follow these steps:
Open the Truecaller application on your phone.
Tap on the three horizontal lines icon in the top left corner of the screen.
Select “Settings” from the menu.
Tap on “Business” and then select “Edit business profile.”
You will see your business name and profile picture. Tap on your business name to edit it.
Enter the new name that you want to use for your business and then tap on “Save.”
How to change name in truecaller database
Changing the name in your Truecaller profile will not automatically change the name that appears in the Truecaller database for your phone number. Truecaller relies on user-generated information to build its database, so the name associated with your phone number may have been provided by other users.
To change the name in the Truecaller database, you can follow these steps:
Open the Truecaller website (www.truecaller.com) in your web browser.
Click on “Unlist” at the bottom of the page.
Enter the phone number for which you want to change the name and click on “Unlist Phone Number.”
Follow the instructions to verify your identity and submit a request to remove your phone number from the Truecaller database.
Once your number is unlisted, you can create a new Truecaller profile with the correct name for your phone number. This new profile should be visible in the Truecaller database within a few days.
How to change true caller name in brackets
The name that appears in brackets next to your phone number in Truecaller is usually based on the information provided by the caller when they saved your number.
However, if you have created a Truecaller profile, your name and any additional information you have provided may appear instead.
By following the steps above, you can update or add new information to your Truecaller profile, which may change the name that appears in brackets for your phone number.
If you want to change the name that appears in brackets for your phone number in Truecaller, you can follow these steps:
Open the Truecaller app on your smartphone.
Tap on the three horizontal lines icon in the top left corner of the screen.
Select “Settings” from the menu.
Tap on “Edit profile.”
Enter the name that you want to use for your phone number in the “Name” field.
If you want to add a nickname or any other additional information, enter it in the “Nickname” or “Tagline” fields respectively.
To change the name of your friend in your contacts or the name that appears for another person in Truecaller, you can follow these steps:
Open the Truecaller on your smartphone.
Type in the phone number for which you want to change the name in the search bar at the top of the screen and tap on the magnifying glass icon.
If the number is saved in Truecaller’s database, you should see the name that currently appears for that number. Tap on the name.
Select “Suggest a better name” from the menu that appears.
Enter the new name that you want to use for the person associated with that phone number and tap on “Submit.”
How to change name and photo in truecaller
You can easily change the name in truecaller from the above method. If you also want to change your photo in Truecaller you can do this in the edit profile option. Tap on your old profile picture and replace it with a new one.
How to change truecaller name in jio phone
There is not any Truecaller application available for the Jio phones. But still, you can change the name in jiophone. You can do this by using the web browser of jiophone. Open the browser and follow the above steps for changing the truecaller name online.
How can I Remove truecaller name online
To remove your name from Truecaller’s online database, you can follow these steps:
Enter your phone number, including the country code, in the “Phone number” field.
Select the reason for unlisting from the drop-down menu.
Enter the verification captcha code.
Click on “Unlist Phone Number.”
Note that it may take up to 24 hours for your phone number to be removed from Truecaller’s online database. Additionally, this process will only remove your phone number from Truecaller’s database, and will not prevent other users from adding your number back to the database.
How to change name in truecaller permanently
When you follow the steps told above to change your true caller name then your name gets changed permanently in the true caller database.
But one thing you must note is that a person who has saved your name incorrectly or any nickname, then while calling him, he will see the name he saved in his contact list.
How Long Does it Take for Your Name to Update?
According to Truecaller, it may take anywhere from 24 to 48 hours for your updated details to reflect on your profile. The time it takes for your name to update in Truecaller depends on a few factors.
If you have changed your name in your Truecaller profile, the update should be reflected immediately in the app.
However, it may take some time for the update to be reflected in the Truecaller database and for other users to see the updated information when they search for your phone number.
What to Do If Truecaller Isn’t Updating Your Name
If Truecaller isn’t updating your name, there are a few things you can try:
Check your Truecaller profile: Make sure that you have entered your name correctly in your Truecaller profile. If your name is not entered correctly, it may not be updating correctly in the Truecaller database.
Verify your Truecaller account: If you have not already verified your Truecaller account, you may need to do so in order to update your name. You can verify your account by entering your phone number and following the instructions in the Truecaller app.
Check your internet connection: Ensure that you have a stable internet connection while updating your name in Truecaller. If your internet connection is unstable, it may prevent the update from going through.
Wait for some time: Sometimes it may take some time for your updated name to appear in the Truecaller database, especially during periods of high traffic. Wait for a few hours and check again.
Contact Truecaller support: If none of the above solutions work, you can contact Truecaller support through the Truecaller website or within the Truecaller app for further assistance.
It’s important to note that Truecaller relies on user-generated information to build its database, so the name associated with your phone number may have been provided by other users.
If your name is not updating correctly in the Truecaller database, it may be because the name associated with your phone number has been provided by other users and has not yet been updated.
You can also contact truecaller support to resole your problem.
How to report a problem with your Truecaller profile
To report a problem you can contact the support team truecaller at support@truecaller.com
Frequently Asked questions on how to change name in truecaller
Can I change someone name on Truecaller?
Yes you can change name of any person in truecaller by suggesting name of that person. To do so, go to truecaller app, search the number and suggest the preferred name.
Why my name is incorrect in Truecaller?
This is because some other person might have saved your name incorrectly in his contact list and truecaller has updated its database from there.
How does Truecaller get people’s name?
Truecaller gets name of a number from the contact list of the mobile of person using the truecaller app. So if the person has saved wrong name then name displayed on trecaller for other person will be also wrong.
Can someone change my name on truecaller?
Yes if you have not verified your mobile number in truecaller then any one can suggest best name for your number and it will be displayed to everyone who has not saved your number.
How can I remove my old name from Truecaller?
Follow the same process as told above to remove your old name in truecaller.
How do you know what name they saved my number?
To know the name you need to login to truecaller website, here search the number, your name will be displayed.
Conclusion for Truecaller name change
At last we can say that changing your name on Truecaller is a simple process, and it can be done in just a few steps. Just open the app and go to settings, here after diting the prophile name you can change your truecaller display name.
So if you were searching for How to Change Name in Truecaller then your search is over here. We have given the easy and best way to correct your name on truecaller. If you fond this guide helpful then share your sweet words in comments and also share this helpful guide to your friends.
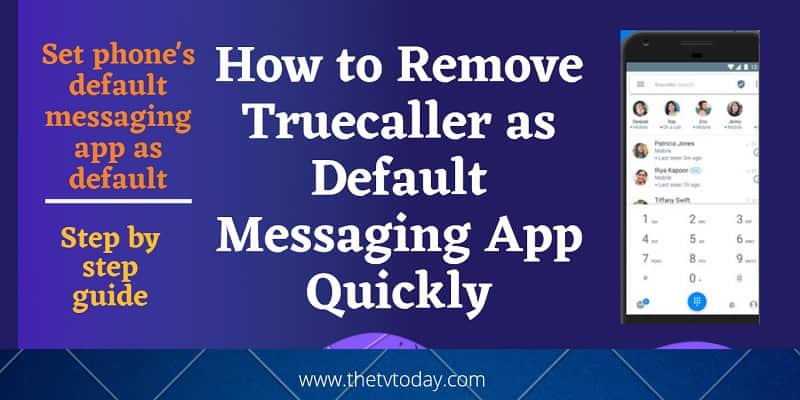
Truecaller is a popular app used by millions of people worldwide to identify unknown callers and block spam calls and messages. It also has a feature that enables it to act as a default messaging app on both Android and iOS devices. However, not everyone is a fan of using Truecaller as their default messaging app. If you’re one of those who want to remove Truecaller as the default messaging app on their Android or ios device, then you’re in the right place.
In this article, we will guide you on how to remove Truecaller as your default messaging app on both Android and iOS devices.
Why remove Truecaller as the default messaging app?
There are a few reasons why you might want to remove Truecaller as your default messaging app. Here are some of the most common ones:
Privacy concerns – Some people are concerned about the amount of data that Truecaller collects and may not feel comfortable using it as their default messaging app. Read Truecaller’s privacy policy .
Advertisements: Truecaller’s messaging app has advertisements, which can be annoying for some users.
Truecaller reading SMS without permission.
We also searched on the internet and found that people are searching for many queries regarding removing Truecaller sms as the default app. Here are those queries:
How to remove Truecaller from default calling app in vivo
Truecaller reading SMS without permission
Why my bank messages are coming in Truecaller
How To stop Truecaller from reading OTP
How to remove truecaller as default messaging app in samsung
How to remove truecaller as default messaging app in mi
How to change default sms app to truecaller in the device settings in mi
How to disable truecaller sms app
How to change truecaller message to normal message
Truecaller reading sms without permission
So we brought the solution to remove Truecaller as default messaging app from Android and iPhone.
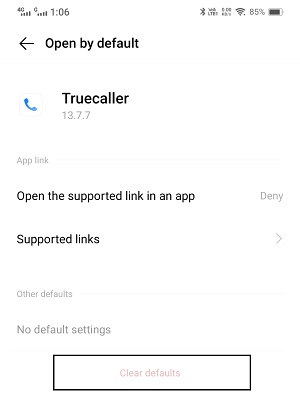
How to Remove Truecaller as Default Messaging App on Android
Here are the steps to remove Truecaller as default sms app in Android Phone.
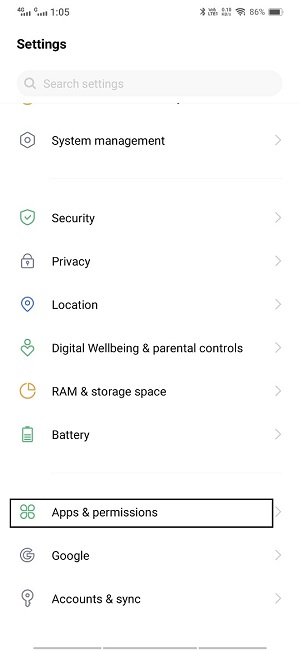
Open the Settings app on your Android device.
Scroll down and tap on the “Apps” or “Applications” option.
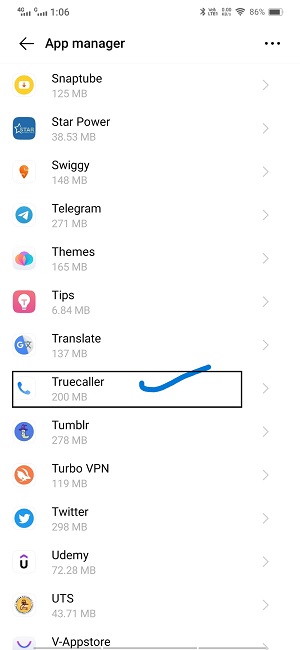
Find and tap on the Truecaller app from the list of installed apps.
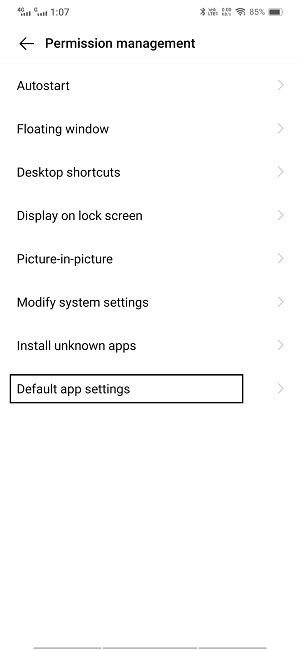
Scroll down and tap on the “Set as default” option.
Tap on the “Clear defaults” option to remove Truecaller as the default messaging app.
After following these steps Truecaller’s default sms app will b removed from your device.
Video Tutorial on How to Remove Truecaller as Default SMS App
Conclusion on How to Remove Truecaller as Default Messaging App
In conclusion, removing Truecaller as your default messaging app is a simple process that can be done in just a few steps. By clearing defaults for Truecaller and setting default sms app again, you can quickly remove Truecaller as your default messaging app on both Android and iOS devices.


")